Marshmallows

Welcome to the New Year! I am very busy these days cleaning my little heart out, and I so rarely get to get back to my kitchen and do what I do best….. create wonderful treats! The adorable five-year old in my home simply adores fluffy Marshmallows…. unfortunately his palate isn’t quite as refined as I had hoped… but again, he is five! He was not a fan, but every other child and adult loved these delicious, fluffy, homemade wonderful Marshmallows. So, one child dislikes but so many others loved!

These Marshmallows are so ridiculously easy to make. This is about the fourth experiment with marshmallow madness and I am very pleased with the results. Plus the cleanup was pretty minimal considering the task! These are an oldie but a goody!

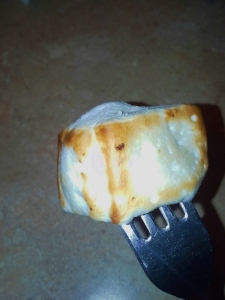
These toast just like your typical store-bought ones, only they toast a little quicker. I of course had to “toast – test” on my stove top, but it was so worth it. I can’t help but be delighted by the results. I added a few egg whites to my mixture to add a little more fluffiness and to avoid a dense, taffy-like chew. They were the perfect texture and very tasty.

20131228_174700_resized20131228_174607_resized

And, as you can see from my “toast-test” these amazingly rough cut treats toast and melt just like those jet puffed store-bought Marshmallows, only they taste one hundred times better. I had to use a fork, no judging!

20131228_174938_resized20131228_175011

Please forgive the terrible photography, I can only good at so many things! As you can see from the photos above, they toast and they come apart blissfully like we love our toasted treats to do! They smoosh like a campfire charm and bounce off of one another as I packaged them for dear friends. They keep in an airtight container for a week, but I had some a few days past and they were still very yummy!

*yields roughly 96 rough cut 1×1 inch Marshmallows

So, here is what you will need…

  • 2 TBSP plus 2 1/2 tsp. Gelatin
  • 1 C. Ice Water
  • 2 C. Granulated Sugar
  • 1/2 C. Light Corn Syrup
  • 1/4 tsp. Salt
  • 2 Egg Whites, the larger the better
  • 1 TBSP Vanilla Extract, or 1/2 of a scraped Vanilla Bean
  • Powdered Sugar, sifted,  amount may vary so just keep it on hand

Here was my process…

  1. Oil and coat with powdered sugar, a 9 x 13 x 2 inch baking pan. make sure to get the sides too!
  2. In the large bowl of your fabulous standup electric mixer, pour Gelatin over 1/2 C. of Ice Water and let stand until softened.
  3. In a heavy bottomed large pot, combine Granulated Sugar, Corn Syrup, Salt and 1/2 C. Ice Water over low heat. Stir with a wooden spoon until sugar has dissolved. Once sugar has dissolved bring mixture to a boil. Using a candy thermometer and not stirring bring the mixture to 240 degrees F. This should take 11 to 13 minutes. Remove mixture from heat and pour over gelatin mixture. Stir until gelatin is dissolved.
  4. Beat on high-speed until mixture is white, fluffy and nearly tripled in size. This should take 6 or 7 minutes in a standing mixer.
  5. In a medium-sized bowl beat egg whites and vanilla until they hold stiff peaks. Add to fluffy mixture and beat until just combined.
  6. Pour mixture into prepared baking pan, and give yourself a break if you can’t get it all out of the mixing bowl, it is sticky!
  7. Sift powdered sugar over the top of the mixture in the baking pan. Make sure to completely cover the top. Any excess will fall off when you are done.
  8. Let chill uncovered in refrigerator for at least 5 hours and up to one day.
  9. Take a thin knife and separate the edges from the sheet of Marshmallow. Turn the pan over onto a baking sheet covered in parchment and using your fingertips, gently loosen the edges and gently ease the Marshmallow out onto the prepared baking sheet. Once the sheet is free, roughly cut 1 inch squares and promptly roll each Marshmallow in powdered sugar to completely coat.  Brush each Marshmallow gently to remove any extra sugar. Toss in a bowl and watch them bounce off of each other.
  10. Promptly enjoy!

These marshmallows re great as a sweet treat, smooshed in a S’more or in some fancy hot cocoa… its up to you! I promise you won’t be disappointed no matter how you choose to enjoy them!

Happy Baking and Candy Making!

Lavender Vanilla Bean White Chocolate

Hey! What is more sexy than chocolate?! Trick question because there is no answer! Add some classic french flavors and hello curvaceous, sweet and sultry candy 😉

I love to use a little culinary lavender in sweets. The key word being, a little. If you overuse this ingredient, your delicious treats can quickly turn to soap. It is a love hate relationship, and you have to make sure your measurements are exact.

That being said, this is a great little taste of France! The vanilla bean gives a delicate look to the white chocolate candy. You might only have a few, but they look great, and taste even better so gifting them is always an option.

I haven’t figured out my own White Chocolate recipe yet, that is on its way. For this candy making batch I just melted down some solid white chocolate, crushed some culinary lavender with ground vanilla bean and set the molds. It only makes me want to be a Chocolatier!

So, you will need…

  • 1/2 lb. Solid White Chocolate
  • 1/8 tsp. Crushed Culinary Lavender
  • 1/8 tsp. Ground Vanilla Bean

Here was my process…

  1. In a double Boiler melt White Chocolate, stirring frequently to allow a smooth consistency.
  2. Once white chocolate is smooth add Lavender and Vanilla Bean and stir. Allow flavors to meld before placing in molds, but be sure to not burn.
  3. I used a measuring cup with slight lip to pour chocolate into the molds. 
  4. Allow to cool until the candy looks glossy and is solid to the touch. About 2 hours. You can always pop the mold in the refrigerator to speed up the process,l or save them from the summer heat!
  5. Pop out of molds and enjoy!

I don’t care what anyone says, making chocolate is hard, and a daunting task. I intend to master the craft, so look out world, my chocolate is on the rise!

Happy Candy Making!


Peanut Butter and Honey Hearts

Yummy Yummy people! I am loving the whole candy making thing, and since it is so hot outside, I figured why not give my oven a break. This is a super easy way to make delicious, fairly guilt free Peanut Butter Cup type treats at home.

I can honestly say that i don’t get the PB&J thing… AT ALL! It is a bizarre combination of food that just doesn’t work for me. Lots of treats involving peanut butter call for salt, but I think peanut butter is salty enough. Some say it adds to the flavor, but so does the chocolate, the honey, etc. No salt needed here. These are the perfect addition to a summer ice cream sundae!

So, you will need…

  • 2 C. Peanut Butter, use the All- Natural kind, it just tastes better!
  • 2 3/4 C. Confectioners Sugar
  • 2 Tbsp. Honey, local honey of course
  • 1/4 C. Butter, at room temperature
  • 1 C. Chocolate or Chocolate Candy Coating finely chopped, tempered for dipping

Here was my process…

  1. Combine peanut butter, butter, confectioners sugar and honey in a bowl. Mix with a wooden spoon until a thick mixture forms.
  2. Take your candy mold and fill each mold, pressing down to make sure all air bubbles have escaped.
  3. Scrape excess off top of each mold, and place in freezer for up to an hour until stiff.
  4. Pop hearts out of mold onto a piece of parchment on a baking sheet.
  5. Temper chocolate or candy coating, I used a double boiler for my candy coating but you can use the microwave too.
  6. Dip hearts into candy coating and let set.
  7. Enjoy!

These are so easy to make, and so much fun to eat. It is always nice to eat homemade candies, and they are going to make a great gift as well!

Happy Baking… or Candy Making!

Maple Bourbon Caramels

The only thing that goes better with Bourbon than a smoldering Don Draper is caramel. Well, it might be a tie, but if I can’t have that tall, dark and handsome man with his slick hair, wearing a classic 1960’s suit standing right in front of me holding a glass of bourbon ( no ice) while I am drinking bourbon, I might as well turn it into a candy. I have been really digging the whole making candy thing lately, and I love love love caramel. So this was a fun little project. And I did it all in my nightwear! Hair all bunched up, slippers on, and no, I didn’t spill a drop. This is cooking like a lady!

These caramels came out smooth and silky, with a hint of the beloved bourbon. The maple flavor is not overwhelming at all, it adds the prefect amount of sweetness to this fun little treat! It is a simple, sophisticated candy my friends. The are divine!

So, you will need…

  • 2 C. Light Brown Sugar, firmly packed
  • 1 C. Heavy Whipping Cream
  • 1/2 C. Milk
  • 1 C. Pure Maple Syrup
  • 4 Tbsp Butter
  • 1/4 tsp Salt
  • 2 Tbsp Bourbon

Here was my process…

  1. Line half of a baking sheet with tin foil, and lightly butter. Create edges, so that the caramel will maintain a brick shape once cooled.
  2. In a large saucepan combine brown sugar, heavy whipping cream, milk, maple syrup, butter, salt and 1 Tbsp Bourbon. Bring to a boil over medium high heat.
  3. Once the mixture comes to a boil cover for 3 minutes. If sugar crystals form on the sides, use a pastry brush dipped in warm water to wipe down the sides.
  4. Remove lid and place a candy thermometer in the mixture. Once the candy reaches 246 degrees F, remove from heat.
  5. Immediately stir in the remaining 1 Tbsp of bourbon.
  6. Pour into prepared pan and let cool for  a few hours until the caramel sets.
  7. Once hard, you can cut and shape your caramels.

Enjoy in your nightwear 😉

Happy Baking!

Honey Sea Salt Caramels

Fun Fun Fun!!! The last time I was in San Francisco I was staying with my darling friend Megan, and across from her little studio apartment there was a coffee shop that sold the most amazing chocolate covered Sea Salt Caramels. I went there nearly everyday to get one. So, I was having a little flash back and I thought to myself, “How hard could it be?”

Turns out it is pretty darn easy if you have the inspiration and the motivation! This caramel is soft, smooth and buttery with a salty finish. The Chocolate adds an entirely new layer of flavor and the whole thing is a delicious combo. Any woman who has ever craved the sweet and salty combo will adore this recipe! There is something to be said for making this combination work, there is a delicate balance, and after a few tries I found the balance I was looking for. I think that the honey really makes this recipe work, but you can decide for yourself!

So, you will need…

  • 1 1/3 C. Heavy Cream
  • 2 C. Granulated Sugar
  • 1/2 C. Light Corn Syrup
  • 1/3 C. Honey
  • 6 Tbs. Butter, cut into small pieces
  • 1 tsp. Vanilla
  • 3 tsp. Sea Salt
  • 1 C. Dark Chocolate (Ghirardelli is the best!)

Here was my process…

  1. Prepare a baking sheet, a deep one, by lining it with tin foil and spraying it with non stick cooking spray. You want your caramel to sit about and inch high, maybe a little less.
  2. Next bring cream to a boil over medium high heat.
  3. Stir in sugar, corn syrup and honey until it begins to boil. Make sure to use a pastry brush dipped in water to wipe down the sides of the pot so that sugar crystals don’t form.
  4. Stirring the caramel occasionally, cook until the caramel reaches 257 degrees F.
  5. Immediately remove from heat and stir in butter, vanilla and Sea Salt.
  6. Pour into prepared pan and let sit at room temperature until it sets. You want the caramel to be hard enough to cut into pieces.

To given them a nice chocolate coat, melt chocolate (using your preferred method, I used the double boiler method), and dip each piece in the chocolate fully covering it. Allow the drips to drip off, and then place on a piece of parchment paper to set. While still wet, sprinkle with Sea Salt.Wait a dew minutes before sprinkling with Sea Salt to avoid the salt just melting into the chocolate.

These are some delicious caramels. They are soft and don’t stick to your teeth, which is a very huge plus! I am a proud lady! These are a great little gift, and just in time for Easter.

It seems like a scary task, but it is a fun process, and there is lots of room to get creative, which is, in itself, truly inspiring!

Happy Baking!