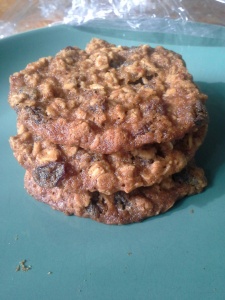
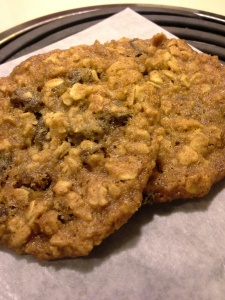
Honey Oatmeal Cookies

So…. my poor yet amazing boyfriend has been in the hospital for a week and let me tell you, hospital “food” is not only depressing it is disgusting! After sitting in the ER on a very hard wooden chair for 13 hours, then sleeping on a very hard chair next to his bed in his hospital room, then sleeping on the hard cement floor in the waiting room…. I was hoping for at least a hot cup of joe. Of course, after a week of hell, it would be crazy to have even that. I ended up with a slightly warm cup of sludge and a questionable pastry. It was enough to make me cry. Well, cry more that is.

I stayed by my man, like any good woman would do, but I was suffering too! We finally came home the other day, and I was hungry, sad, happy and worried all at the same time! So… I just wanted to make myself some comfort food. What says comfort like oatmeal in cookie form? I love oatmeal raisin cookies and I love honey. The simple idea of baking them lifted my spirits and gave me the energy to take care of my still very sick boyfriend. It was just what the doctor ordered!

20131009_111259_resized

So, here is what you will need…

  • 1/2 C. Butter, softened
  • 1/4 C. Granulated Sugar
  • 1/2 C. Light Brown Sugar, packed
  • 1 tsp. Vietnamese Cinnamon
  • 1/4 tsp. Nutmeg
  • 1/2 tsp. Ginger
  • 1/2 tsp. Salt
  • 1/2 tsp. Baking Soda
  • 1 1/2 tsp. Vanilla Extract
  • I large Egg
  • 3 Tbsp. Honey
  • 3/4 C. All purpose Flour
  • 1 1/2 C. Old Fashion Oats
  • 1 1/2 C. Raisins

Here was my process…

  1. In your mixer, cream together butter, granulated sugar and brown sugar until mixture is smooth.
  2. Add spices, salt, baking soda and vanilla. Mix on a low speed until combined.
  3. Beat in Egg and Honey.
  4. Add flour and mix until combined.
  5. Add oats and raisins and mix until your dough forms. About 2 minutes.
  6. Cover tightly and chill for at least 2 hours.
  7. Once the dough has chilled, pre-heat oven to 375 degrees F and line baking sheet with parchment. Drop cookies onto prepared baking sheet. Cookies will spread out, so make sure to leave  2 inches between cookies.
  8. Bake for 10 minutes, let cool on baking sheet for 5 minutes then transfer to cooling rack.

20131006_162906_resized

Enjoy these super chewy cookies at breakfast, or lunch or really whenever you feel a little bit down. I’m telling you, after a week in the hospital watching the person you love suffer, these cookies will be like a giant hug for your soul.

Happy Baking!

Soft-Batch Chocolate Chip Cookies

First of all let me start by saying…… YES! These were such a hit in my house as well as my dear friend Jessica’s house. They passed the five-year old test and won over the thirty something crowd without any hesitation. These cookies are going to be a new classic for me, and I am proud to present that to you!

I have been a real stick in the mud the past week or so and my poor boyfriend was so overly patient and understanding of my irrational ways. I decided that the only true way to say “I’m Sorry” was with cookies. He eats and claims to like all of my baking, so I thought I would make something that he always asks for, soft-batch chocolate chip cookies. It is amazing what a little cornstarch can do to a cookie!

These cookies are chewy without being under-baked and they stay fresh for up to seven days! They are kind of a wonderful cookie. There were four other test batches before this one, and I finally got the results that I was looking for…. mouth-watering chocolaty chewy goodness.

There are a few fun little tips when trying to make a thick, chewy and soft cookie. First of all, chilling the dough results in thicker cookies. You have to chill this dough for at least 3 hours, but you can chill up to 3 days. Second, using melted butter and a dash of extra flour will result in a more chewy cookie! The Chocolate chips don’t really stick to the dough because of the butter, but if you evenly distribute them to the best of your ability, the cookies will be just fine.  You can always add more to individual cookie dough balls before baking. Using more brown sugar thank white sugar will give you a very moist and soft cookie! But finally cornstarch will give you the desired softness you have been searching for! These are simple tricks and tips to making a crowd pleasing cookie that all people can enjoy!

20130923_083741_resized

Here is what you will need…

  • 2 1/4 C. All Purpose Flour
  • 1 tsp. Baking Soda
  • 1 1/2 tsp. Cornstarch
  • 1/2 tsp. Salt
  • 3/4 C. Butter, melted, just a touch browned
  • 1 C. Brown Sugar
  • 1/4 C. Granulated Sugar
  • 1 Egg + 1 Egg Yolk
  • 2 tsp. Vanilla Extract
  • 1/4 tsp. Cinnamon
  • 1 1/4 C. Chocolate Chips

Here was my process…

  1. In a large mixing bowl lightly mix together flour, baking soda, salt and cornstarch. Place to the side.
  2. In a medium size bowl combine melted butter, brown sugar and granulated sugar. Whisk together until smooth and o lumps of sugar remain.
  3. Quickly whisk in vanilla, egg and egg yolk until well whisked!
  4. Pour butter mixture over flour mixture and mix until just combined. The dough will be very, very soft but that is how it is supposed to be!
  5. Fold in Chocolate Chips, they will not stick to the dough because of the melted butter, but again, just fold them in and you can add a few here and there if needed.
  6. Cover with plastic wrap and let chill for at least 3 hours and up to 3 days.
  7. Once chilled, let sit at room temperature for about 10 minutes. While you let the dough sit, preheat the oven to 325 degrees F and line a baking sheet with parchment paper.
  8. Roll dough into balls about 1 inch around, and place on baking mat. If you need to smush them down a bit go ahead, they will taste amazing no matter what, but the higher the ball the thicker the cookie!
  9. Bake at 325 degrees F for 10 – 12 minutes. The cookies will no look done, but take them out anyway. They bake for a little bit longer on the baking sheet. Let cookies sit on baking sheet for 9 minutes and then transfer to a wire cooling rack.

20130923_083924_resized

These cookies are so super yummy…. I am thinking about baking more right now. Not to mention they are a real treat for your tummy!

Happy Baking!

Brown Butter Cookies

I can’t resist the taste or smell of browned butter. I am feeling a little “snacky” these days, thank you nature, and all I can think about is guacamole and browned butter. So, I turned it into a cookie! Not the guac, haha, I have to let perfection lie on that one.

This cookie has a crisp delicate body that literally melts away in your mouth. The lack of egg gives it so much character, and it almost acts as a less dense shortbread. It is a very different cookie, and it is delicious and versatile.

These are a lot of recipes for this cookie out there, mine is a little different because I use a little Maple Sugar in mine. I like to pay homage to my home state in my baking. It actually really makes a difference. The taste is so smooth and savory. I like the idea of a savory cookie. Maybe next time I will toss some Taleggio Cheese in there.

After spending the last few days working with chocolates, blogs are on their way, I wanted something less sweet, more satisfying . The smell wafting from the oven is worth it alone. It makes my home smell like heaven. And yes, my version of heaven is filled with butter!

So, you will need…

  • 2 Sticks Sweet Cream, Unsalted Butter
  • 2/3 C. Granulated Sugar
  • 1 Tbsp. Maple Sugar, a little maple goes a long way
  • 2 1/3 C. All-Purpose Flour
  • 1 tsp. Baking Powder
  • 1 tsp. Vanilla Extract
  • 1/2 tsp. Coarse Sea Salt, plus extra to sprinkle on top.

Here was my process…

  1. Preheat oven to 325 Degrees F. Line 2 baking sheets with parchment paper.
  2. In a heavy saucepan, melt butter on low heat until browned. About 7-9 minutes.
  3. Once butter is browned remove from heat and add granulated sugar and Maple Sugar. Stir in until well combined. Don’t wait for the sugar to dissolve because it isn’t going to. 😉 Let cool for about 5 minutes until cooled.
  4. Combine the flour and baking powder and slowly mix into the butter mixture until a smooth delicious dough forms.
  5. Roll dough into 1 inch balls and place on prepared baking sheets.  Give each ball a little room to expand.
  6. Bake at 325 degrees F. for 18-20 minutes or until edges start to look golden blonde.

You can pair this cookie with a creamy soft cheese and some fruit, or toss it on top of a nice bowl of frozen custard. There is no wrong way to eat these. Plus the smell is intoxicating, so even if you don’t like cookies, bake them! Plus it gives your guy a little something to look forward to. Which makes him super sweet and compliant 😉

Happy Baking!

Orange Honey Ice Cream Sandwiches

Yay!!! Summer is upon us and there is no end in sight. The endless possibilities of summer treats make me feel like I could bake forever! I have three pages of things I want to create and share with my loved ones. The fresh squeezed lemonade, strawberries and cream, fresh green salads… and watermelon! The flavors go on and on. For today I settled on Oranges and Honey. Yummy yummy!

I wanted a cookie that would be able to make a sort of “Dreamsicle” type Ice Cream Sandwich. SO, I made Orange Honey cookies and used some 1/2 fat vanilla bean ice cream for the filling. The ice cream complimented the cookies so well, you would think that the ice cream company had invented this cookie. Alas, it was I… just a simple baker.


So, you will need…

  • 2 C. All Purpose Flour
  • 2 tsp. Baking Soda
  • 1/4 tsp. Salt
  • 1/2 C. + 2 Tbsp. Canola Oil
  • 1/4 C. Honey
  • 1 C. Granulated Sugar
  • 1 Tbsp. Fresh Squeezed Orange Juice, yes, freshly squeezed!
  • 1 Egg

Here was my process…

  1. Preheat the oven to 350 degrees F and line baking sheets with parchment paper.
  2. In a medium bowl combine flour, baking soda and salt. Set aside.
  3. In a large bowl combine canola oil, honey, sugar, orange juice and egg. Beat with mixer of your choice until all ingredients are well combined.
  4. Pour dry mixture into wet mixture and mix until all ingredients are incorporated. DO NOT over beat.
  5. Spoon dough onto prepared baking sheets allowing room to spread.
  6. Bake at 350 degrees F for 9-11 minutes, until sides are a lovely honey brown.
  7. Remove from oven and let cool completely before creating a Cookie Ice Cream Sandwich!

These cookies are surprisingly delicious and work very well in this situation! They are also good on their own, or with milk. Milk and honey after all, are very good friends.

Happy Baking!


Double Chocolate Coconut Cookies

I love coconut, but I am not a fan of chunks of it in my cookies! I love the tropical flavor and the how much fun it is to break one open. I also love Chocolate Chip cookies but you can only blog about the simple, yet delightful cookie so many times.

I was wandering through a little co-op type place in Randolph, Vermont when I found the solution to my cookie problem. Coconut Sugar?! As skeptical as I was, I bought it. I let it sit around for a week or so before I said, “What is the worst that can happen?” Fully knowing the answer I proceeded anyway. I mean, how terrible could it really be?

The cookies were amazing! The Coconut Sugar has the same effect as a brown sugar, and my cookies were buttery, crispy and chewy in the right places and an overall fantastic surprise.

So, you will need…

  • 1 1/4 C. All Purpose Flour
  • 1 tsp. Baking Soda
  • 1/2 tsp. Salt
  • 1/2 C. Butter, softened
  • 1/2 C. Coconut Sugar
  • 6 Tbsp. Granulated Sugar
  • 1 Large Egg White
  • 1 tsp. Vanilla Extract
  • 1/2 C. White Chocolate Chips, for the best flavor look for the white Chips that contain Cocoa Butter 😉
  • 1/2 C. Dark Chocolate Chips

Here was my process…

  1. Preheat the oven to 350 degrees F and line two baking sheets with parchment.
  2. In a medium bowl sift together the flour, baking soda and salt. Set aside.
  3. In a large bowl combine butter, coconut sugar, and granulated sugar. Beat with a wooden spoon until smooth. Feel free to use your mixer.
  4. Add the egg white and vanilla. Beat until well combined.
  5. Slowly add the dry ingredients in increments of your choosing until everything is well mixed.
  6. Stir in the chocolate chips.
  7. Drop spoonfuls of dough on to prepared baking sheets allowing 2 or so inches between each cookie for expansion.
  8. Bake cookies, one sheet at a time, at 350 degrees F for 10-13 minutes. Tops should be a rich golden brown, and somewhat firm to the touch.
  9. Let stand for around 5 minutes, then remove to cooling rack.
  10. Enjoy!

This is just a slight variation in ingredients, but a rather large variation in taste. served warm with a little  Talenti ‘Sea Salt Caramel’ Gelato or maybe a nice glass of Cupcake ‘Angel Food’ wine, or a classic glass of cold milk… no matter what, you will not be disappointed.

Happy Baking!

Framboise Dream Meringues

First of all I want to say Sorry for my absence. Sometimes a gal must roam!

Who doesn’t love a delicious Prosecco? Framboise Beer is a fantastic  Raspberry Belgian Craft Beer, and lets face it ladies, if we are going to drink beer, it might as well be fancy beer. This is the Prosecco of Beer.

So, for my comeback recipe, I made a delicious Meringue cookie with Framboise and white chocolate. It is truly divine! It is light and airy, yet chewy as all meringue should be. They are sweet and delicate, just like me.

So, you will need…

  • 1/2 C. Confectioners Sugar, sifted
  • 3 Large Egg Whites, at room Temperature
  • 1/4 tsp Cream of Tartar
  • 1/3 C. Granulated Sugar
  • 1 Tbsp + 1 tsp Framboise Beer
  • 1/2 C. White Chocolate Chips

Here was my process…

  1. Preheat oven to 250 Degrees F and line two baking sheet with Parchment Paper
  2. Sift the confectioners sugar onto a plate and set aside.
  3. In a large bowl combine egg whites, cream of tartar and Framboise. Beat on medium until soft peaks form.
  4. Slowly add the granulated sugar and beat on medium high until stiff, glossy peaks form.
  5. Using a rubber spatula, gently fold in the confectioners sugar, then fold in the white chips.
  6. Drop the dough on the prepared baking sheets, you can sprinkle the baking sheets with powdered sugar to make them stick less, spacing them about 1 inch apart.
  7. Bake at 250 degrees F for 55 minutes. Remove from baking sheet and let cool.

These are so much fun to eat, and you really do feel a twinge of sexy sophistication while eating them. Plus you won’t need more than one or two of this ladylike treat, which is good for the midsection. Put on your best night wear, throw on an old classic, pour a glass of Prosecco, and have yourself a treat.

After all, Life is but a Meringue…

Happy Baking!

Shortbread Sandwich Cookies w/ “Fancy” Chocolate Frosting

Shortbread is a very versatile cookie. You start with your basic dough and you can literally add anything edible to it. I’m not so sure how some ingredients would taste, but hey… we live in a world full of possibilities now don’t we?! My friend leaves for 42 days in 4 days so I was trying to make him something from his request list. He wanted shortbread cookies with chocolate “on top”. To me that meant sandwich cookies… haha, I heard what I wanted, leave me alone! 😉

So, I decided to just keep the lovely shortbread simple. Butter is all that I needed to get the flavor I wanted, but a nice chocolate to be sandwiched was in order. I wanted something not too sweet, but sweet enough. I tried a few different combinations of chocolate to powdered sugar to cream, and I found the best one for this cookie. I love sandwich cookies!!!!!!!

So, you will need…

*Makes 30 cookies

  • 1 C. Salted Butter, softened (Adds to the flavor)
  • 2 C. All-Purpose Flour
  • 1/2 C. Powdered Sugar
  • 1/2 tsp. Salt
  • 1 tsp Vanilla

Frosting

  • 1/2 C. Powdered Sugar
  • 1/2 C. Unsweetened Cocoa Powder
  • 1/4 C. Heavy Cream
  • 1 Tbsp Vanilla
  • add milk if you need a thinner icing/frosting


Here was my process…

  1. Preheat oven to 350 degrees F and prepare 2 baking sheets, can line with Parchment Paper, but it isn’t necessary
  2. In a small bowl whisk together flour and salt, set aside.
  3. In a medium sized bowl, cream butter using mixer of your choice, and mix until light and fluffy. About 1 minute.
  4. Add powdered sugar and vanilla, beat until smooth. About 2 minutes.
  5. Stir in the flour mixture until everything is well combined.
  6. Take dough and flatten it into a disk on a piece of plastic wrap. Wrap it up.
  7. Refrigerate for 1 hour.
  8. Unwrap the dough and roll it out onto a slightly floured surface. Rolling the dough to be about 1/4 inch thick.
  9. Using a circular floured cookie cutter, (you can get crazy and use whatever cutter you fancy!!!!), cut out as many cookies as you can.
  10. Place cookies on the cookie sheet then put into icebox (fridge) for 10 minutes. This allows the cookies to maintain their shape during baking.
  11. Bake at 350 degrees F for 8-10 minutes.
  12. Let cool completely before frosting and making the glorious sandwiches!

While the cookies are cooling you can prepare your frosting. Take the powdered sugar, cocoa, vanilla and cream and mix it all together at the same time until you have a smooth consistency. If you need to make the frosting thinner, or it isn’t wet enough add a tsp of milk at a time until you are happy with it!

These cookies might sound boring to you, but they appeal to my 1950’s inner housewife in an undeniable way! Make a batch, wear an apron, drink a martini in the middle of the day, enjoy a shortbread cookie sandwich. 😉

Happy Baking!


Chili Chocolate Chunk Cookies

I was in possession of a beautiful bar of dark chili chocolate, and I wanted to make some cookies… so…. I combined the two! Instead of using chocolate chips I simply cut the chocolate bar into chunks and tossed it in my dough when the time was right. I tasted the chocolate and fell in love with the way the chili crept up on me. It is subtle and smooth, the perfect amount of chili! Lindt really mastered this one!

I wasn’t too sure if these cookies would be any good so I made a small batch to test out. These cookies definitely go better with a nice red wine than with the traditional milk, but throw a little ice cream between a few cookies and you are in for a treat!

If you just have chocolate chips you can use a 1/4 tsp of chili powder instead!

So, you will need…

  • 1 1/4 C. All-Purpose Flour
  • 1 tsp Baking Soda
  • 1/2 tsp Salt
  • 1/2 C. Unsalted Butter, room temperature
  • 1/2 C. Packed Brown Sugar
  • 1/4 C. Granulated Sugar
  • 1 Egg, beaten
  • 1 tsp Vanilla
  • 1 C. Chopped Chili Chocolate

Here was my process…

  1. Preheat oven to 350 degrees F and line 2 baking sheets with parchment paper.
  2. In a medium bowl, SIFT together flour, baking powder and salt. Set aside.
  3. In a large bowl combine butter, brown sugar, granulated sugar and beat with your trusty wooden spoon until smooth.
  4. Add beaten egg and vanilla, beat until well combined.
  5. Slowly incorporate dry ingredients until everything is mixed entirely.
  6. Fold in chili chocolate chunks.
  7. Drop 1 inch balls of dough, 2 inches apart onto prepared baking sheet.
  8. Bake for 10-12 minutes.
  9. Sprinkle with coarse sea salt at when they are fresh out of the oven.

If you are up for something different I say give these a try. They aren’t the everyday cookie which makes them that much more fun!

Happy Baking!

Apple Butter Oatmeal Cookies

I love to eat, and as I have previously mentioned in this blog, I am also a “Juicer”, which means one or two of my meals each day are juiced! I am like every other woman in the world who just isn’t satisfied with her weight! Anyway, today I am experimenting with a new way to make Oatmeal cookies.  Most of the recipes I have come across in my time call for lots of sugar and lots of butter and that seems like it would cancel the “healthy” right out of them. On the other hand it kills me to look for an alternative to butter because butter is glorious and possibly the best ingredient since Kobe beef, I mean… am I right or am I right?!

I tried to used yogurt and banana instead of butter… and they weren’t “bad” but the cookies seemed more like a muffin than a cookie. I decided that cutting out butter, at least for me and my baking style, isn’t going to give me the results I require for excellent baking! So, I figured that cutting back on the butter and the sugar was good enough for this recipe!

Luckily these are one of my favorite cookies, and they aren’t that bad for you to begin with. So… let us see!


So, you will need…

*makes 40 smaller cookies or 18 large cookies

  • 2 1/2 C. Oats
  • 1 C. All-Purpose Flour
  • 1/2 tsp Baking Soda
  • 1/2 tsp Baking Powder
  • 1 1/2 tsp Cinnamon
  • 1/8 tsp Nutmeg
  • 1/4 tsp salt
  • 3 Tbs Butter, softened and unsalted
  • 2 Tbs Canola Oil
  • 1 C. Light Brown Sugar, packed
  • 1 Egg White
  • 1/3 C. Apple Butter, homemade of course
  • 2 tsp Vanilla
  • 3/4 C. Raisins and Chocolate Chips (Combined)

Here was my process…

  1. Preheat oven to 350 Degrees F and line two cookie sheets with parchment paper.
  2. In a medium-sized bowl combine oats, flour, baking powder, baking soda, cinnamon, nutmeg and salt.
  3. In a larger bowl mix butter and canola oil until combines and creamy. Then add brown sugar, mix until everything is well mixed and looking fluffy (using a beautiful wooden spoon of course!)
  4. Add egg white, apple butter, vanilla and raisin+chocolate chips. Mix well.
  5. Combine the dry mixture with the wet mixture, mix until all ingredients are well mixed in.
  6. Use your hands to for cookies. Slightly moisten them with water so that the dough doesn’t stick. Form little 1/4 inch balls for a smaller cookie, or a 1 1/2 inch ball for larger ones. Then flatten each cookie with your damp fingers to get a more elegant look to your fabulous cookies.
  7. Space cookies about 1 to 2 inches apart.
  8. Bake at 350 degrees for 15- 18 minutes.

And I will say, these are pretty good! You barley notice the lack of white sugar and excess of butter. Give it a try my little bakers and let me know what you think!

Happy Baking!

Pumpkin Spice Cookies

Hello my little  bakers! So, I was trying to come up with a “healthy” version of a pumpkin cookies, and as it turns out, a “healthy” pumpkin cookie is a muffin! SO, back to test kitchen with some delicious Pumpkin Spice cookies! You need butter to make these cookies the way I want them! Believe me, these cookies melt in your mouth, and it is so worth it to run that extra mile once you taste these! I’m going to run five today!

Anyway, these cookies have all the taste of a spiced pumpkin pie, but with a light and airy body. They literally melt away as you take a bite! They are easily made into cookie sandwiches, and they taste amazing both ways. If you want a crisper cookie try cooking them for 20 minutes or so, checking the bottoms after 15 minutes to make sure they don’t burn.

So, you will need…

  • 2 C. Butter, softened
  • 2 C. Sugar
  • 2 tsp. Baking Soda
  • 2 tsp. Baking Powder
  • 1 tsp. Salt
  • 1 tsp. Cinnamon
  • 1 tsp. Nutmeg
  • 2 eggs
  • 2 tsp. Vanilla
  • 15 oz. Pumpkin puree
  • 4 C. All Purpose flour

Frosting

  • 1/2 C. Butter
  • 1/2 C. Brown Sugar
  • 1/4 C. Milk
  • 1 tsp Vanilla
  • 2 1/4 C. Powdered Sugar
  • 3 Tbs. Heavy Cream
  • 1 tsp cinnamon

Here was my process…

  1. Set the oven to 350 Degrees F.
  2. Beat butter in a large bowl for 30 to 45 seconds until fluffy.
  3. Add sugar, baking soda, baking, powder, salt, cinnamon and nutmeg and mix well. (You can use a hand blender, a stand up mixer or a good old-fashioned wooden spoon.)
  4. Add eggs and vanilla and beat until combined.
  5. Add pumpkin, mix until well combined.
  6. Add flour gradually and use a wooden spoon to mix the flour in until well combined.
  7. On a parchment lined baking sheet, use a pastry bag to pipe out cookie onto sheet. They should be about 1 1/2 inches wide and 2 inches apart so they don’t spread out into one another.


  1. For the Frosting, in a saucepan heat up the butter and brown sugar until smooth and melted.
  2. Stir in milk and vanilla.
  3. Beat in powdered sugar  and cinnamon until smooth.
  4. Add  Heavy Cream to cut the sweetness
  5. Let cookies cool completely before attempting to frost them, unless you want to try one immediately!

If these cookies don’t put a smile on your face, you might just be dead! Please try and enjoy!

Happy Baking!